Poor Posture? These Exercises Can Help!
The majority of Americans are afflicted with poor posture. The stagnant nature of desk jobs increases the forward head and rounded shoulders that are indicative of poor sitting posture, and this phenomenon has been exacerbated with the recent work-from-home push combined with the increase in technology use – “text neck” is a thing! Even children and teenagers are beginning to notice pain in their necks, backs, and joints related to sitting in an improper position for long periods of time doing virtual classes. And women tend to have this problem due to their anatomy, especially if they are large chested. Poor posture is not just a problem in sitting either! Poor standing posture can include slouching, weight shifting onto one side more, locking out the knees to utilize the leg muscles less, and arching or rounding the back instead of activating the glute muscles.
I gave a few presentations on this topic months ago, but then set it aside until my husband requested that I give him some exercise ideas to help with his posture related pain. I figured the exercises I gave him would be beneficial to others as well! I hope you enjoy the video despite the distractions, it was a family event and my son was very vocal throughout. I review each exercise in the YouTube video below:
The most common symptoms of poor posture are tightness in the upper cervical (neck) region and the pecs (chest), and weakness in the shoulders/upper thoracic (upper back) and cervical flexors (front of neck). I tell my patients this is a criss-cross pattern: diagonal muscles are weak, and the opposite diagonal muscles are tight. This may not help everyone to understand, but for visual learners think of a side view of the upper body with an X through it. So we want to elongate/stretch the tight muscles and strengthen the weak muscles.
1.) Thoracic extension over foam roller: There should be a certain amount of curve in the thoracic spine, but when people have poor posture they fold forward and increase that curve too much which causes pain. To reverse this, lay over a foam roller* horizontally with it just below your shoulder blades. Place your hands behind your head and bring your elbows close together. Slowly lower over the foam roller in a reverse crunch, until your back is extended. Repeat 20 times.
*you can get a foam roller at any sporting goods store, but the cheapest one I’ve found is at Five Below in their exercise section.
2.) Modified fish pose: This puts your thoracic spine in a similar position to the above exercise. Recline on your elbows, arch your low back, and lean your head back. Option to do this for 5 sec 20x or 10 sec 10x, try both and see what works best for you!
3.) Pec stretch on foam roller: This chest opener feels amazing! Lay with your spine vertical on the foam roller and open your arms wide. Try to find the place where you feel the most stretch in your pecs – move your arms up and down and bend or straighten your elbows until you find your sweet spot and stay there. Option to add weights in your hands to get a better stretch. You can either do this for 20 sec 5x, or just hold this position for 2-3 minutes.
4.) Rows: These are targeting your weak shoulder girdle. The video uses theraband but you can do these unweighted or even with light hand weights. Keeping elbows close to your body, pull your shoulders and elbows back like you’re trying to pinch a pencil between your shoulder blades. Repeat 20 times. The video demo shows rows at 3 different levels, which targets the 3 sections of the upper traps to strengthen.
5.) Upper cervical flexion: Laying on your back, bring your chin toward your chest while trying to only move the very top of your neck. Use your eyes to look down to activate those upper cervical muscles. This will be a good stretch on the muscles at the base of your skull, that are constantly being activated too much with a forward head position. Repeat 20x.
6.) Deep cervical flexor strengthening: These muscles on the front of your neck are almost never engaged and definitely weak. We use our superficial flexor muscles a lot to nod, but our deep flexor muscles get overlooked. To strengthen them, lay down and press the back of your head into the table. If you feel like you gave yourself a double chin, you’re doing it right! Hold for 10 seconds and then relax for 10 seconds, and repeat 10x.
As with all exercises, listen to your body. Don’t go past the point of pain, and if a prescribed amount of exercise feels like too much then do what you can and build up to it. Take breaks and let your muscles rest between sets and between exercises. Because your body isn’t used to these motions they will feel like a lot of work, even though you’re just using your body weight. You may be sore the next day or two!
I hope these exercises can help others who are struggling with pain related to poor posture, to start to help you return to a good alignment and to maintain that alignment while sitting and standing! As always, feel free to reach out with any questions about the above post or clarification on exercises.
Why a Towel is Your Most Important Piece of Exercise Equipment
Yes, you read that right – a towel. Not weights, not stretchy bands, not a treadmill or stationary bike, not the large exercise balls (while they all have their place). Much like Hitchhiker’s Guide to the Galaxy, I feel as a physical therapist that a towel is a versatile item that can be used in a variety of ways when performing exercises. Sometimes all the fancy bells and whistles in a gym can be confusing and overwhelming when exercising anyway, so let’s get back to basics. Here are some ways that I recommend a towel can be used while exercising.
- To maintain elbow contact with body during rows, or internal/external rotation shoulder exercises. This helps to improve form.
- To perform a stretch (ie hamstring stretch, ankle stretch, shoulder extension stretch) with increased resistance. It’s a nice substitution for a strap to help increase range of motion during stretching.
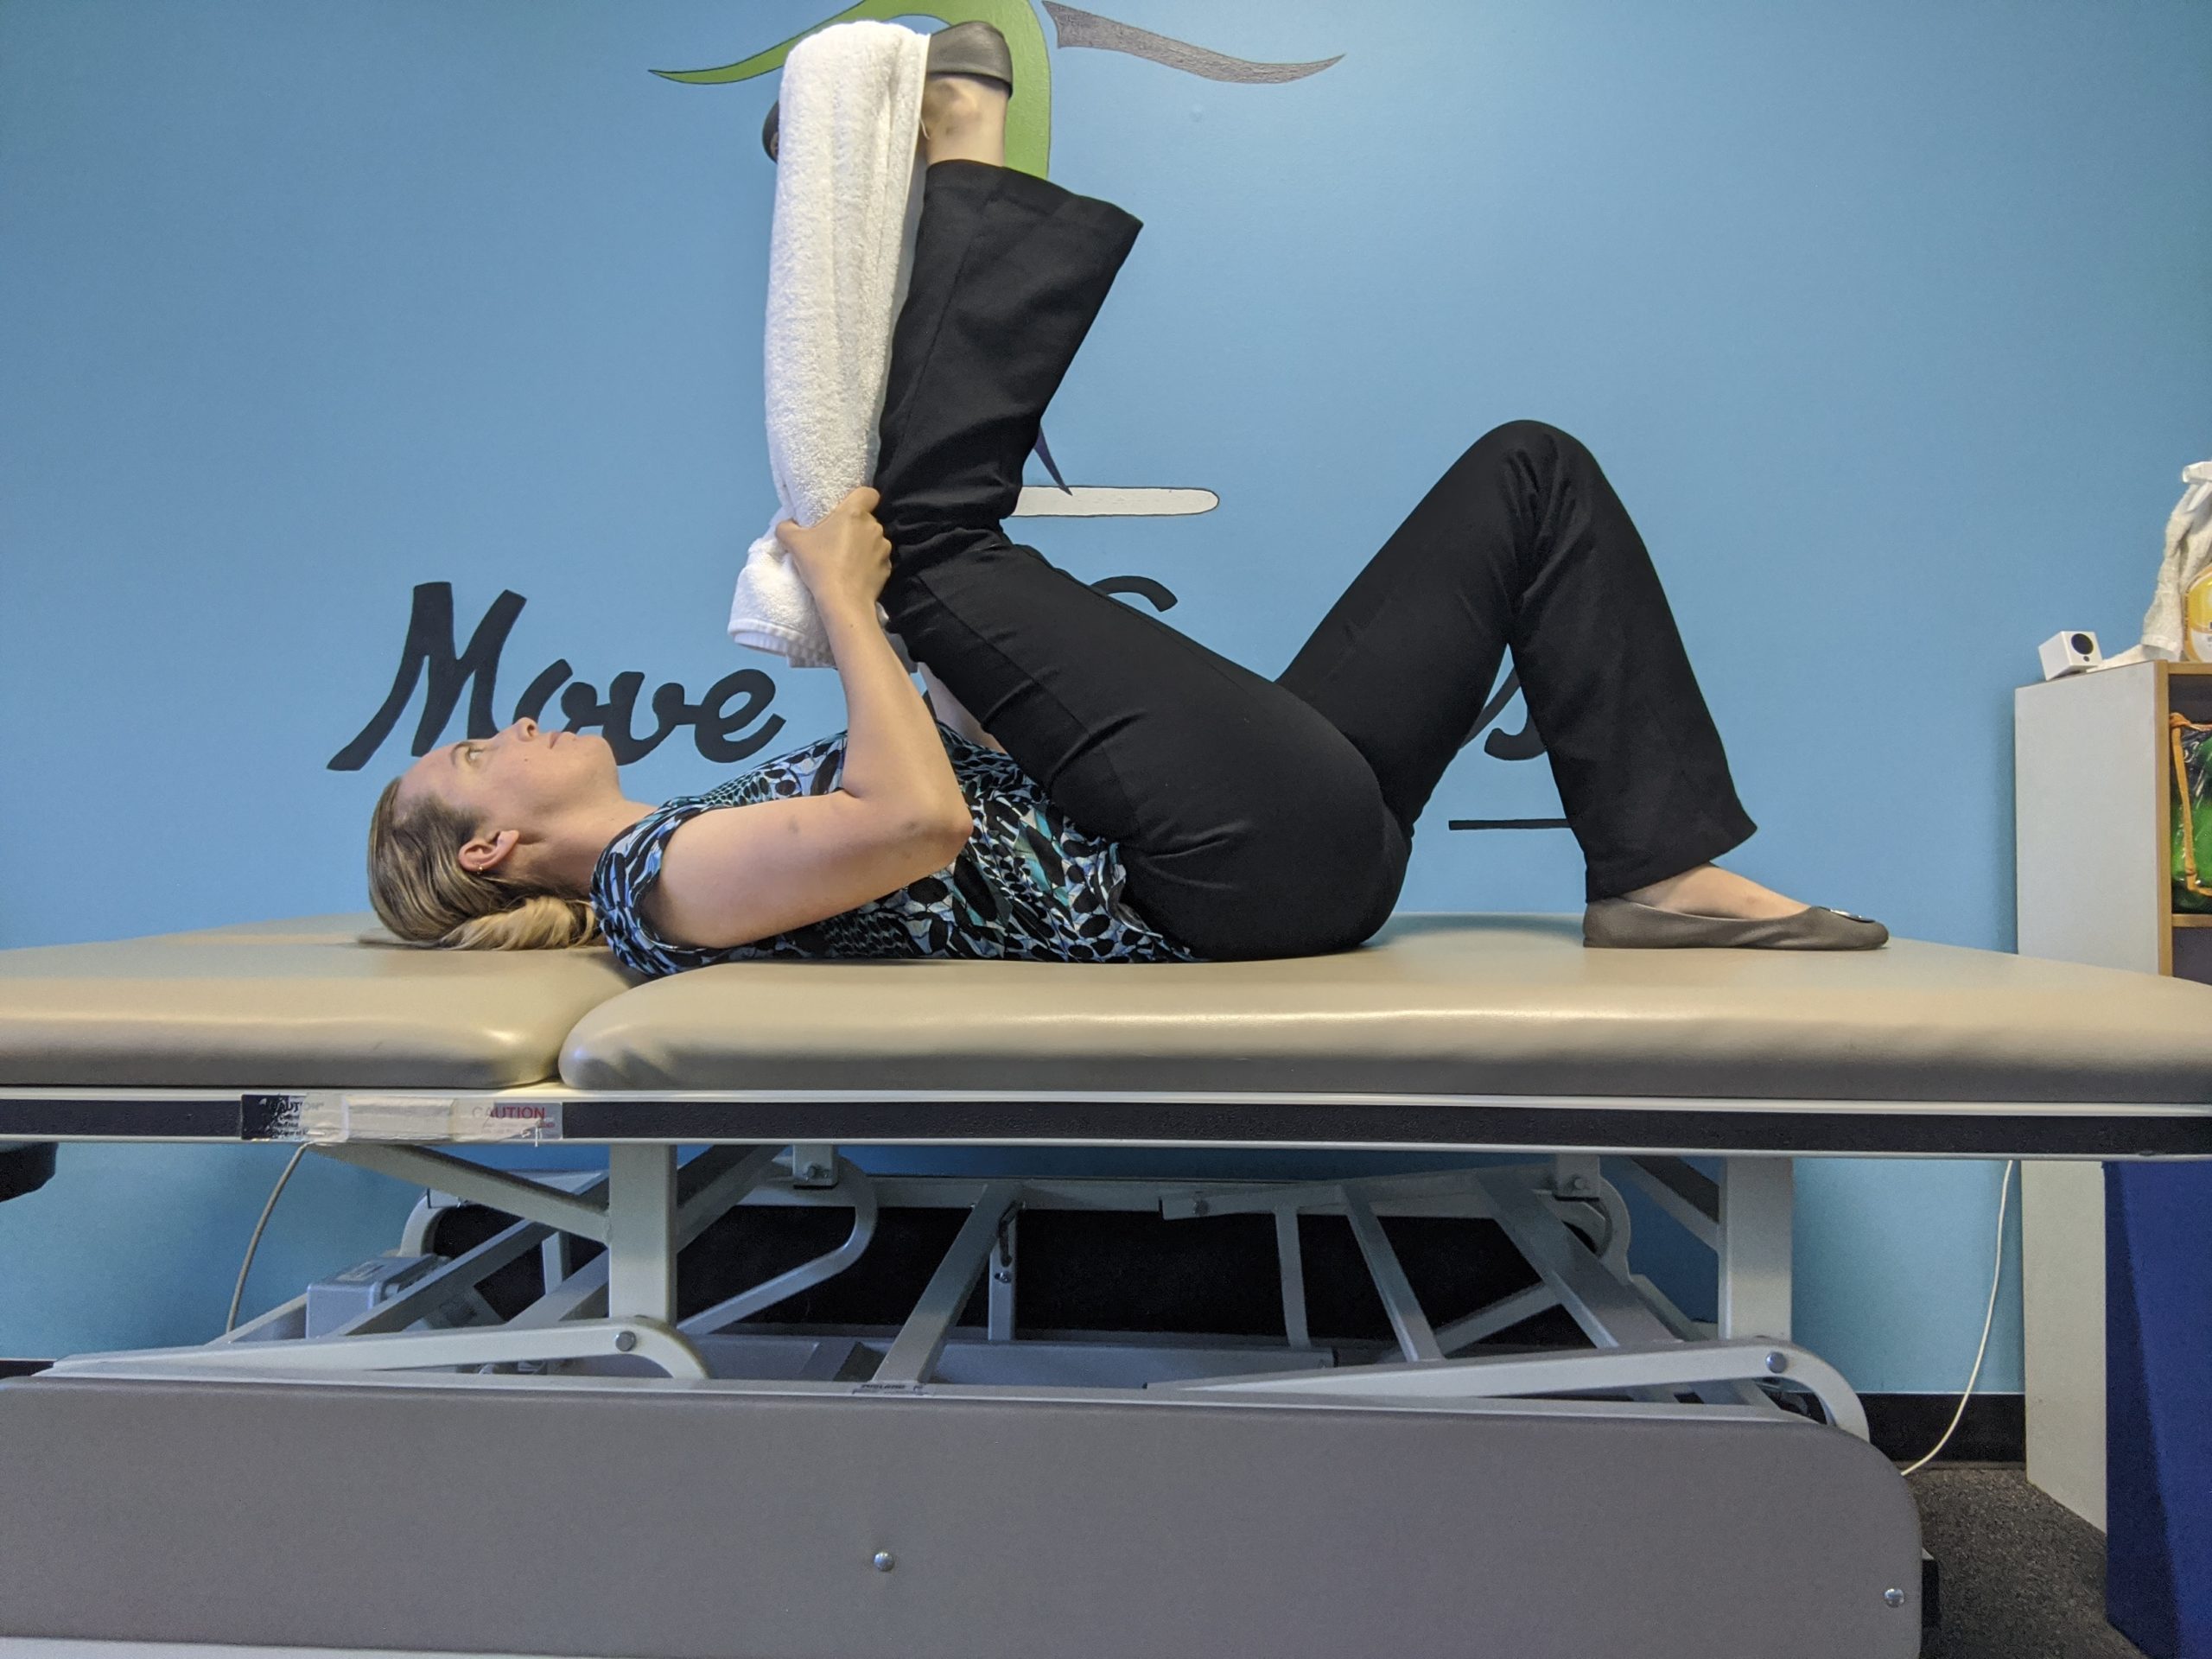
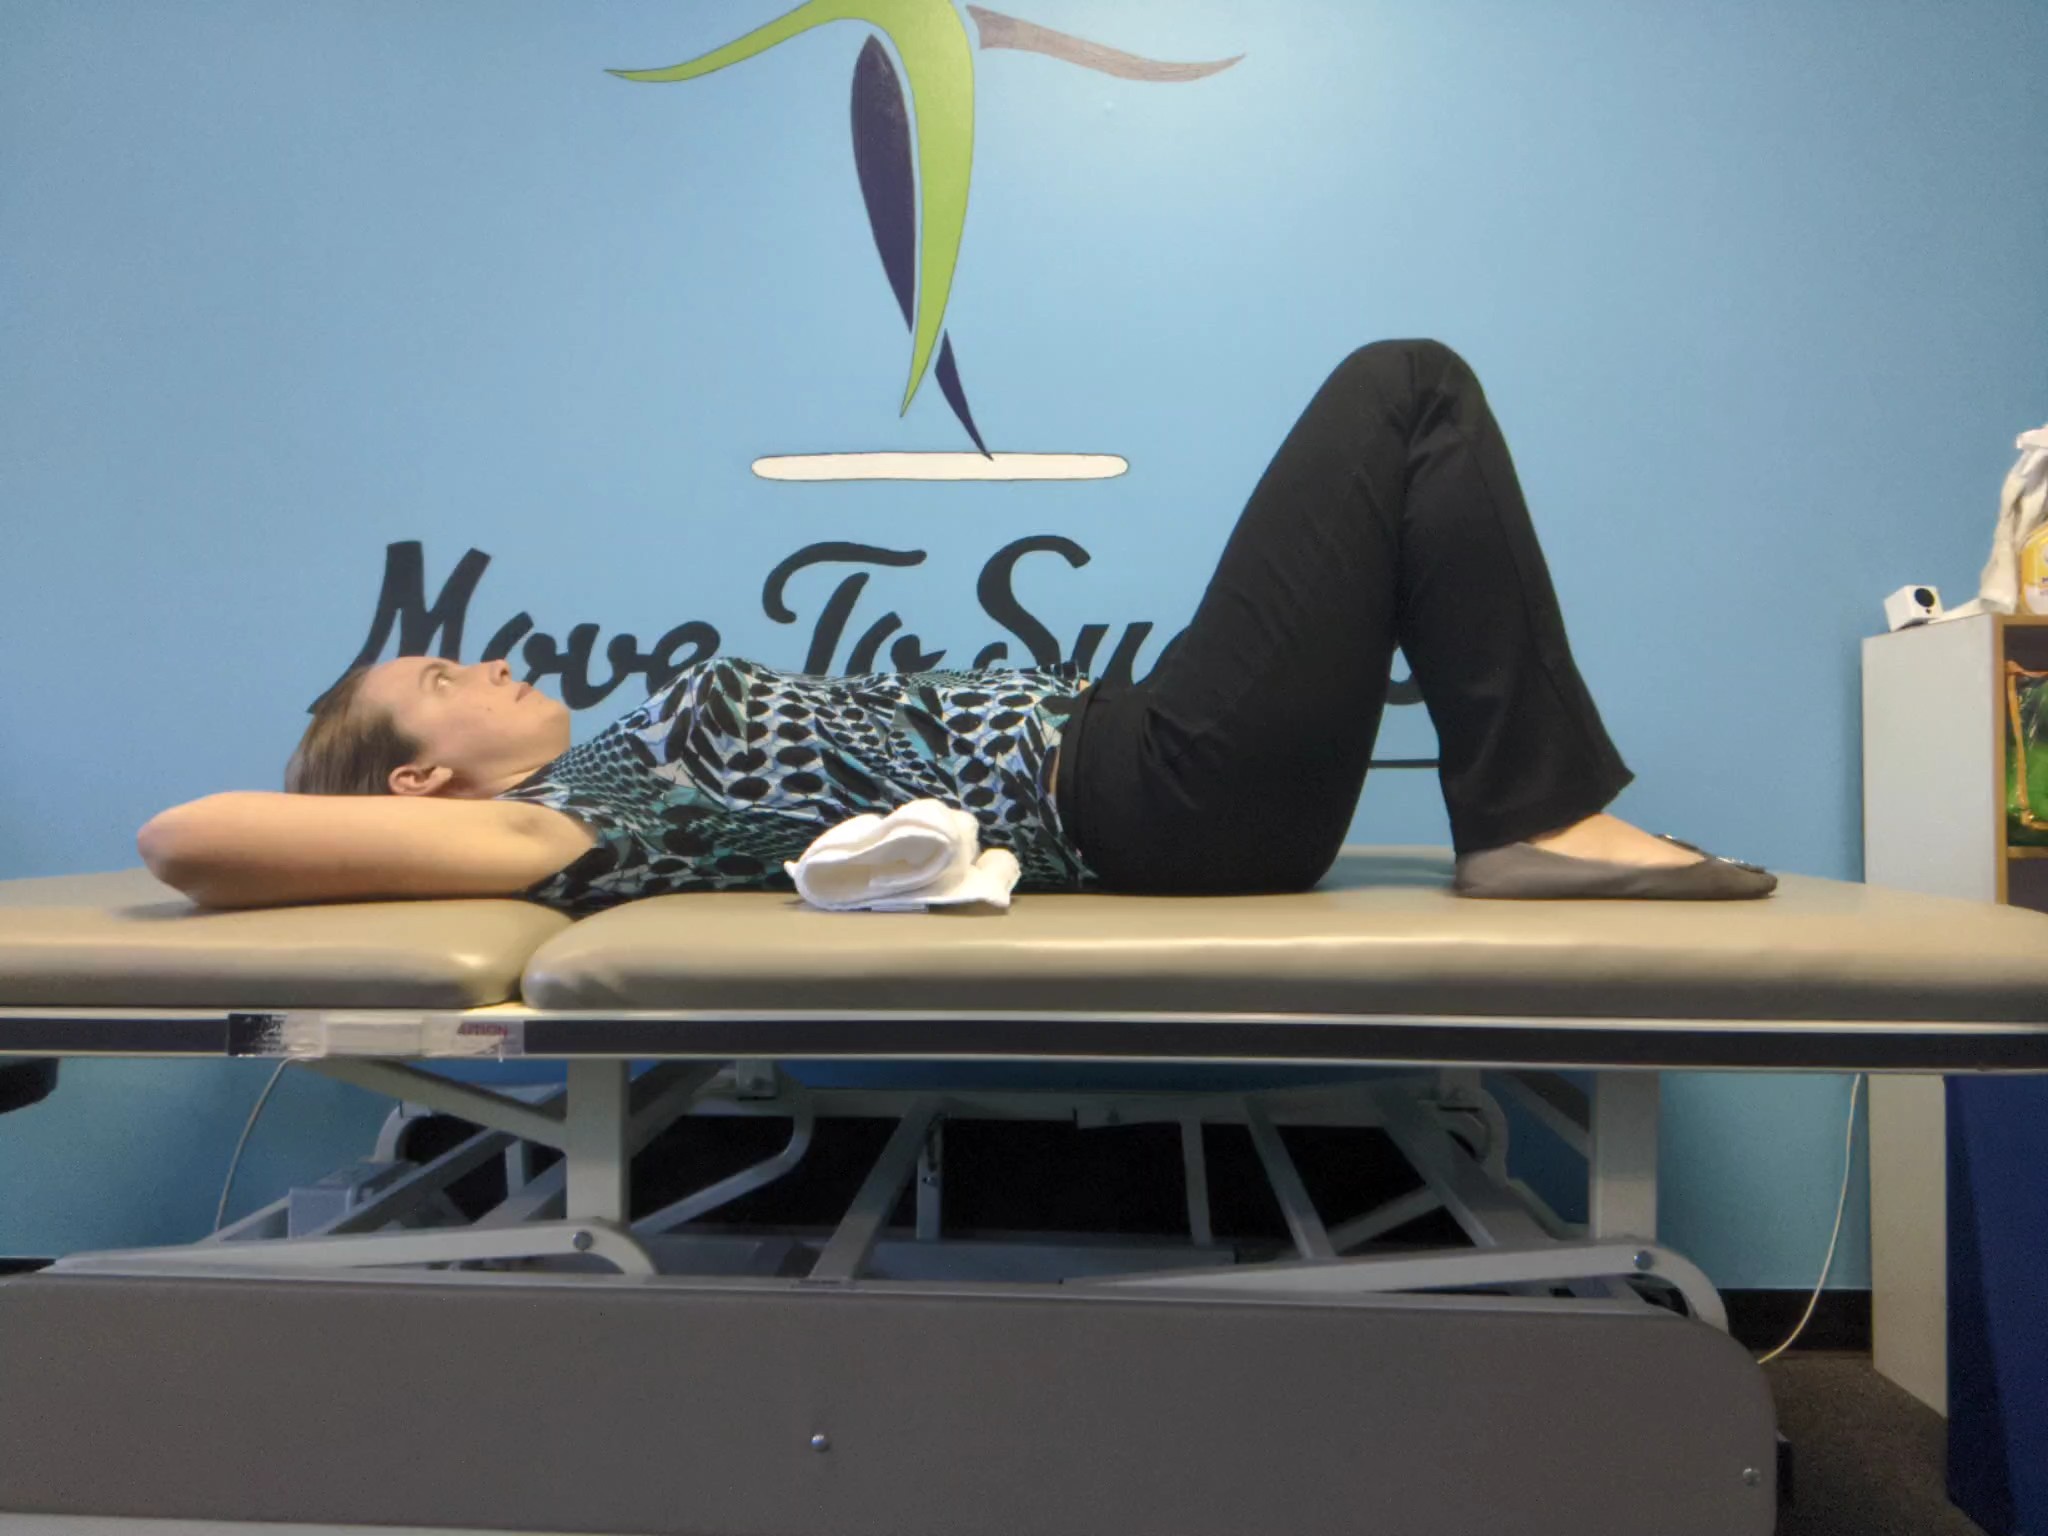
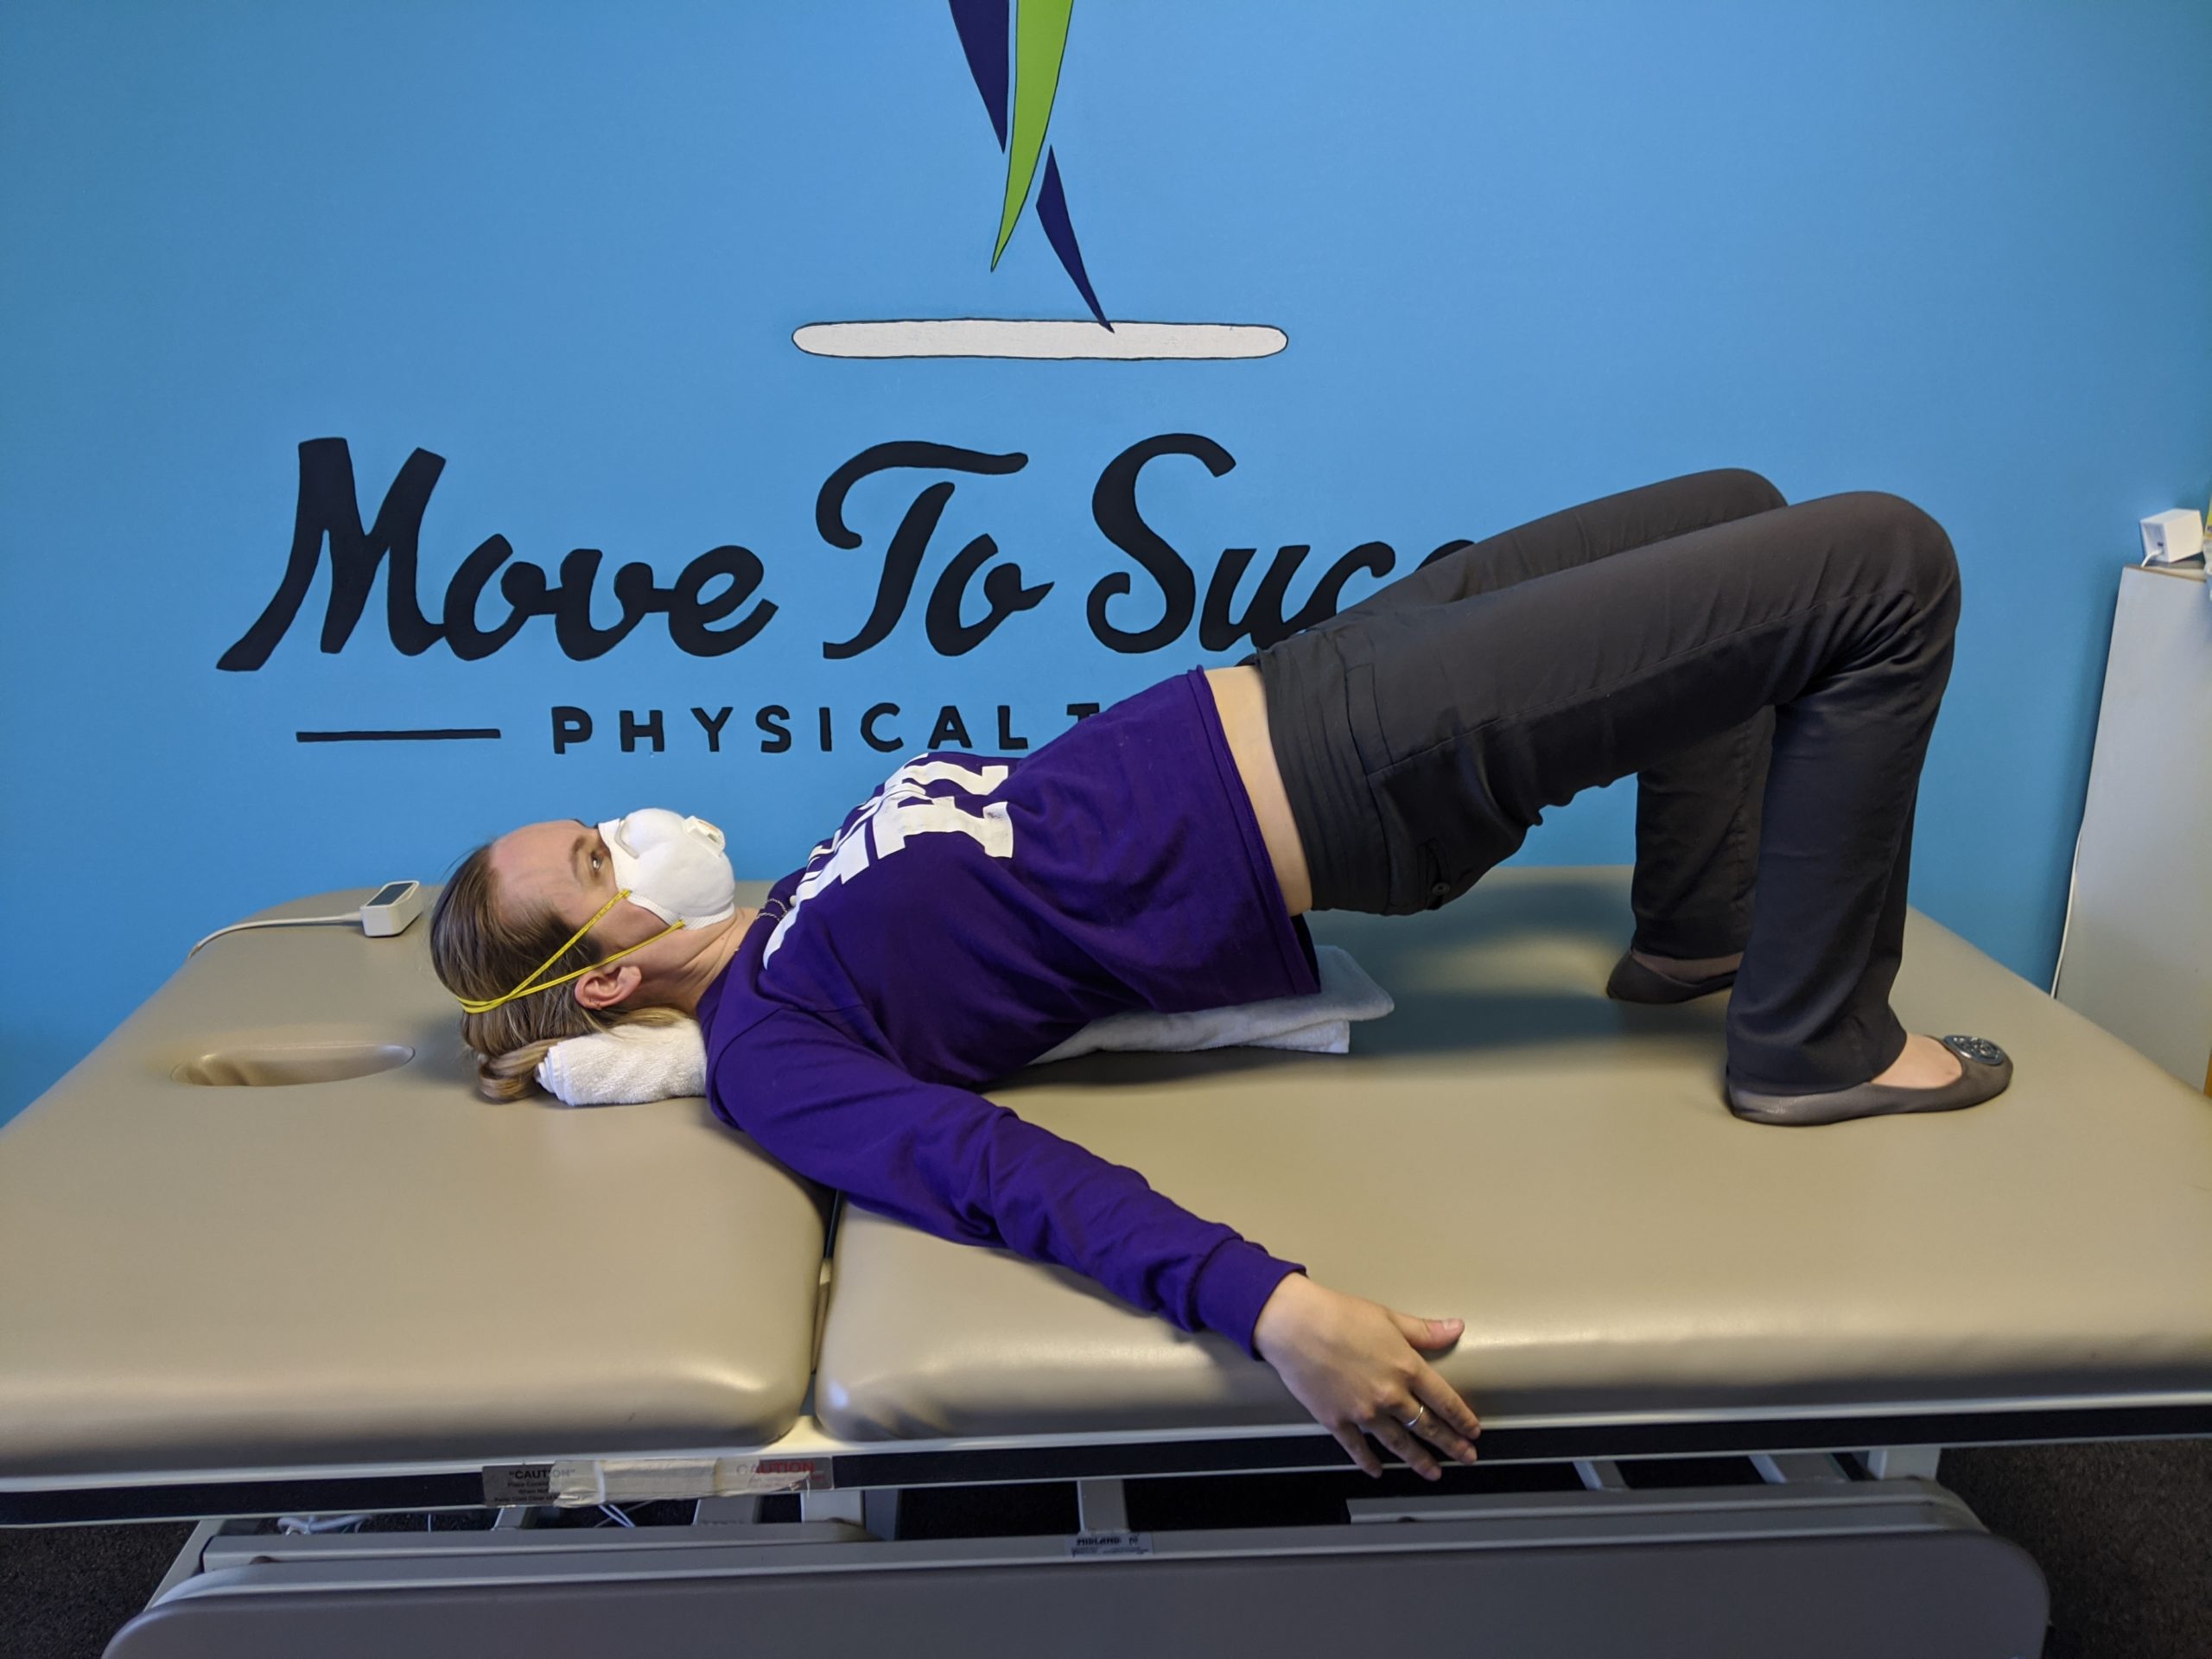
- As a lumbar support when laying on your back to do exercises. Roll the towel in a ball and put it under the small of your back to maintain the arch and avoid back pain.
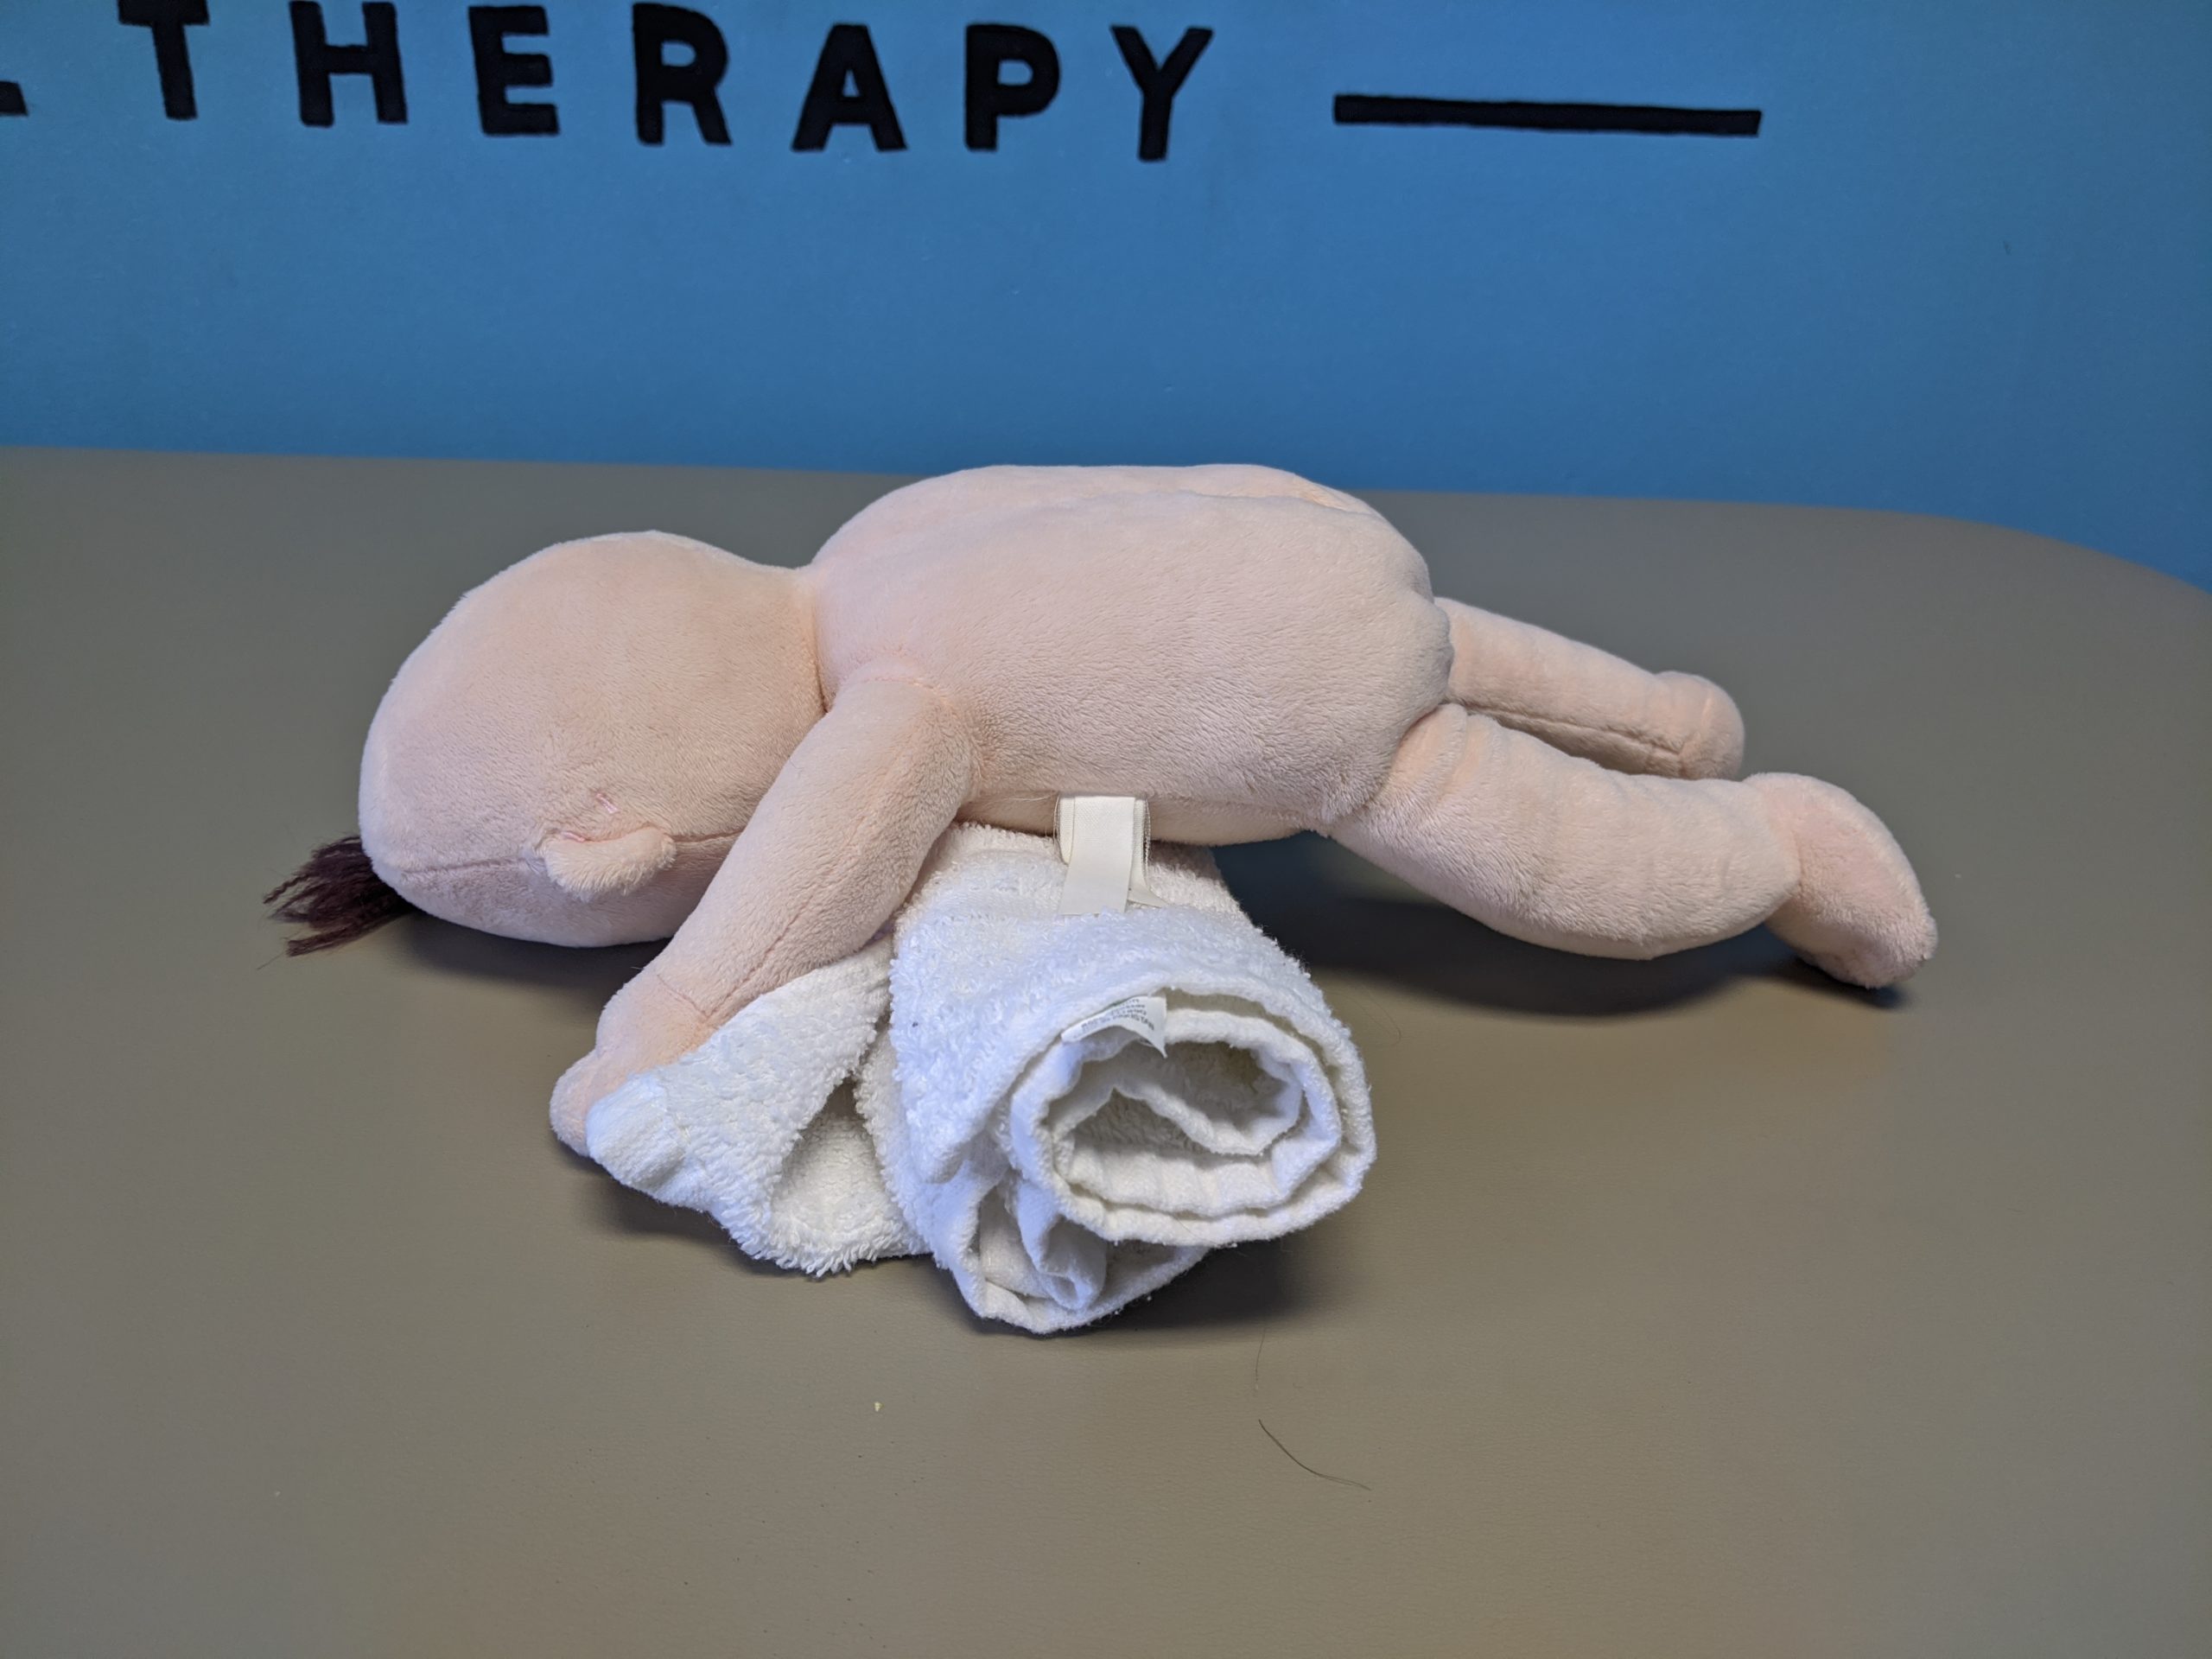
- As a prop/support for babies who have difficulty with sitting balance or pushing up on elbows while on their belly. A rolled towel underneath a baby’s armpits can give their shoulder girdle a little extra support and allow their heads to lift up a little higher. And giving a baby a folded towel to rest their hands on can help them sit up a little straighter.
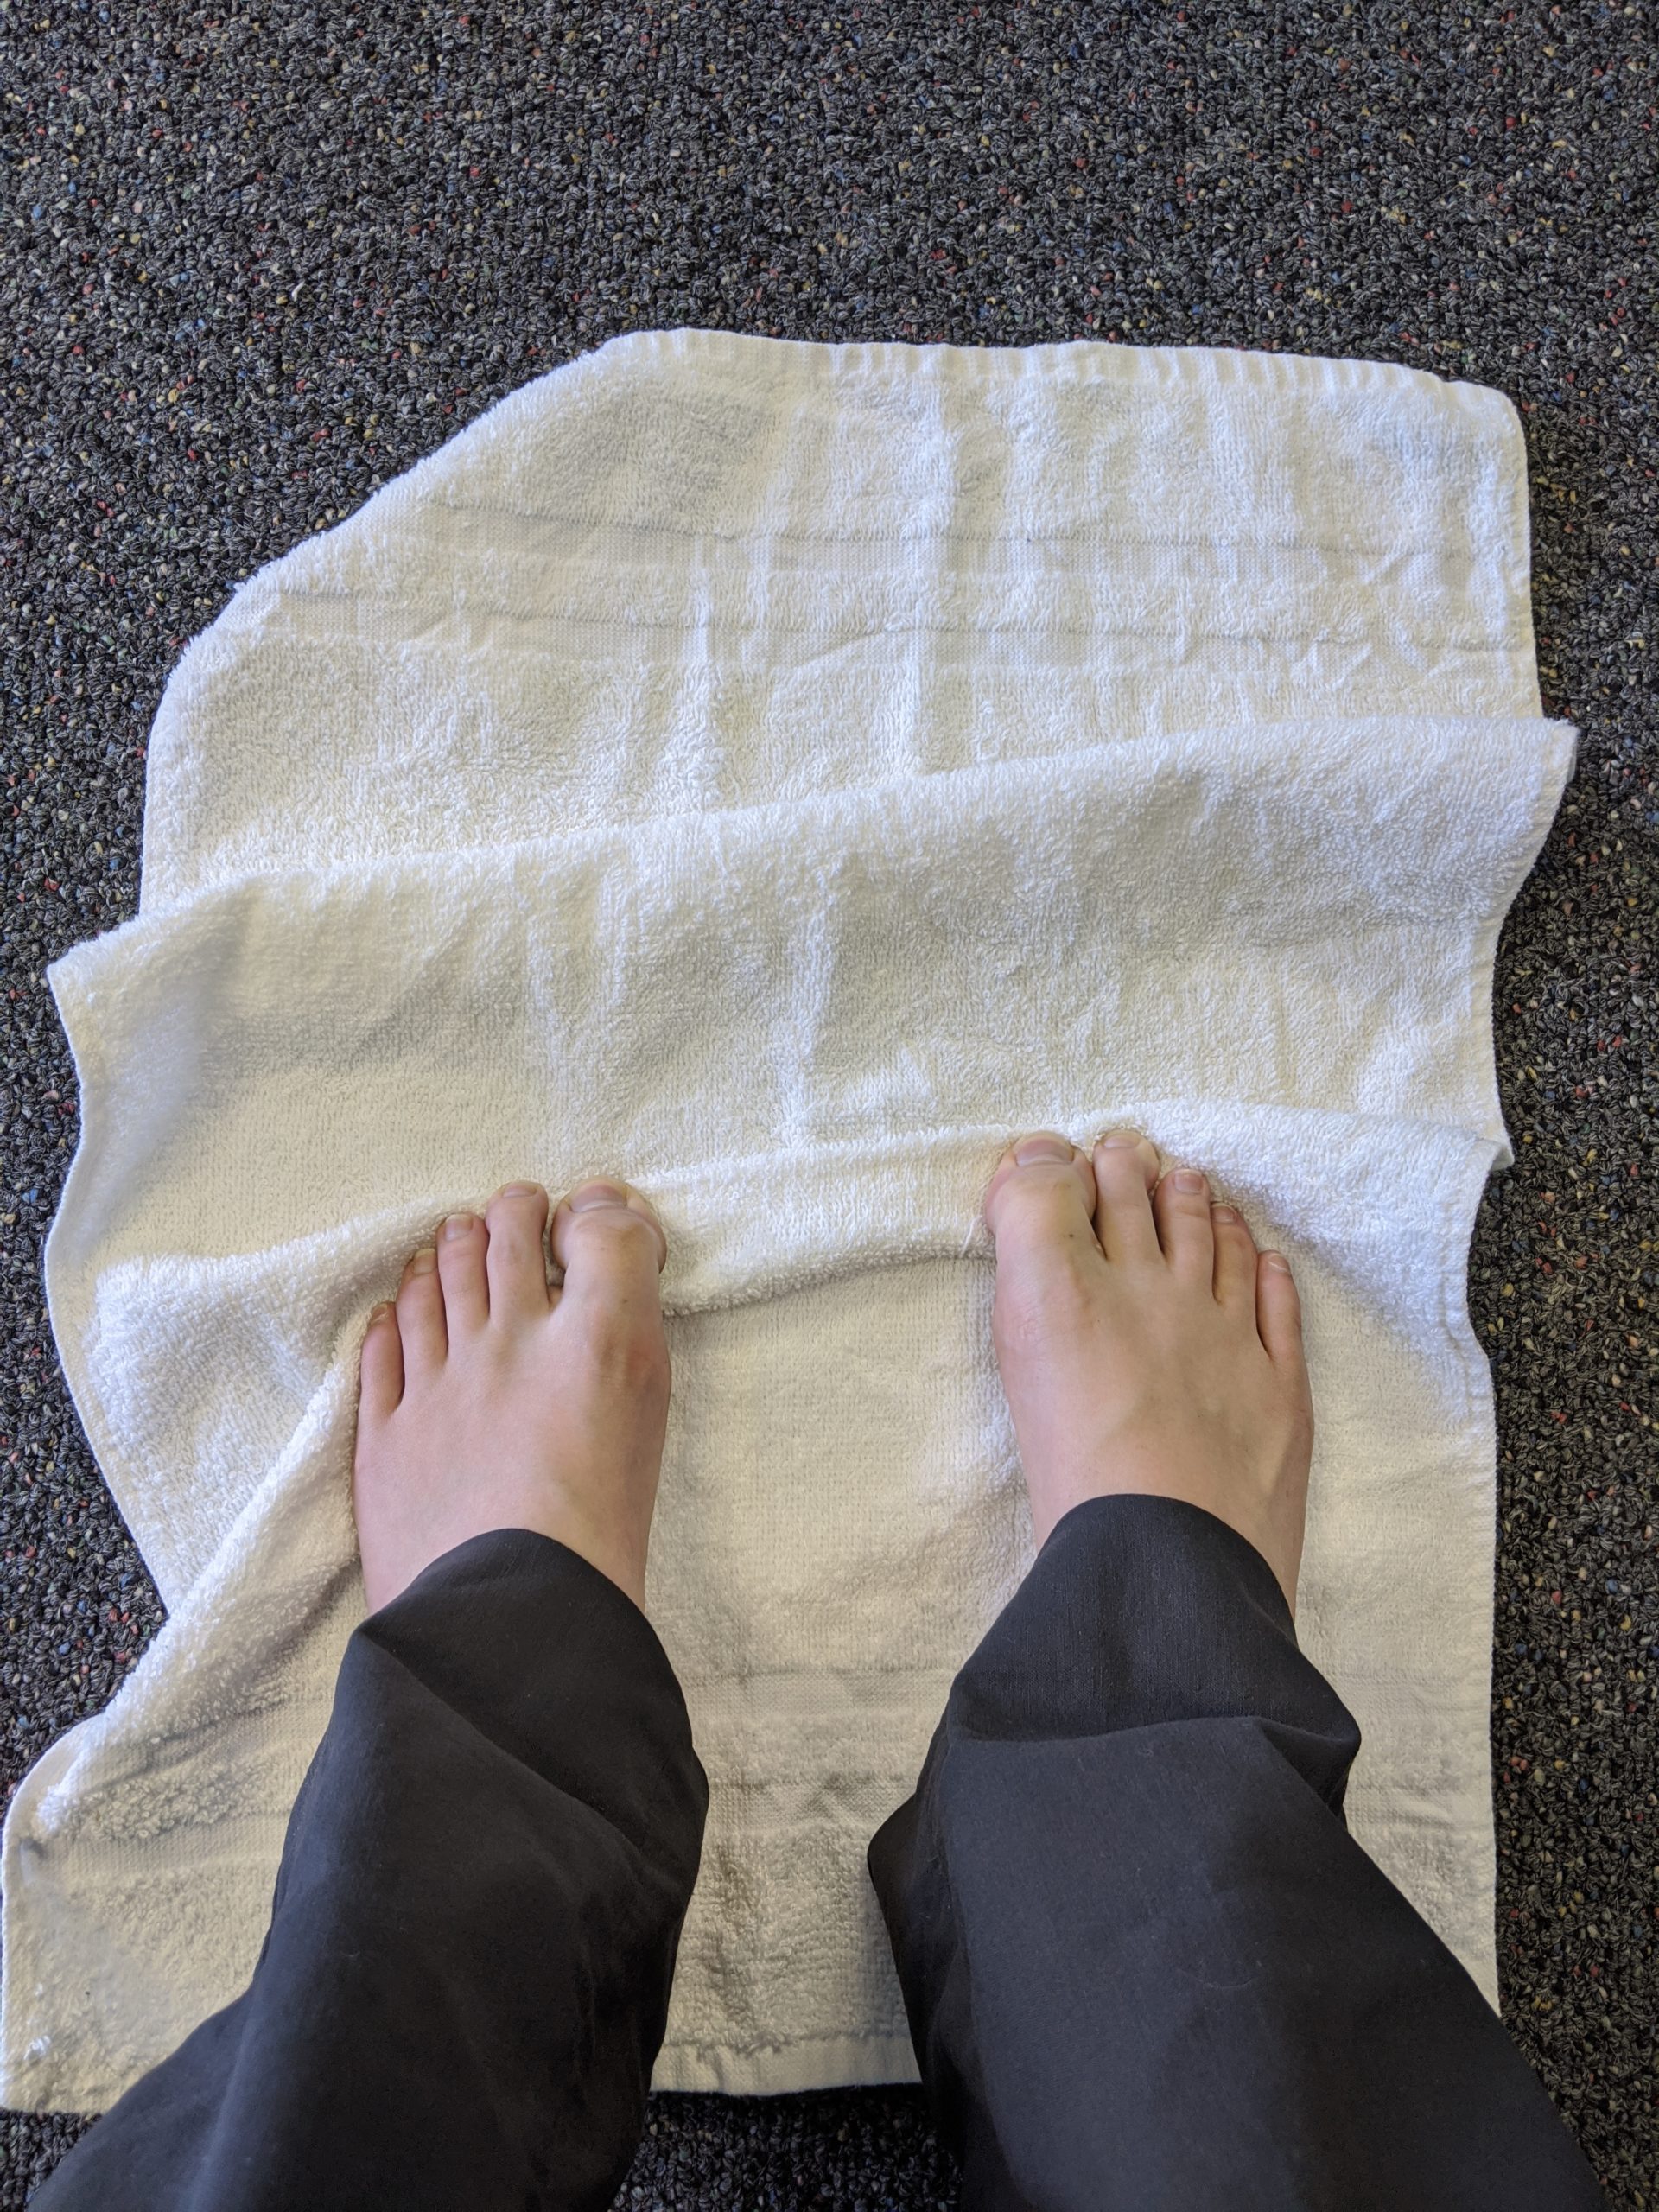
- To activate intrinsic foot muscles by doing towel scrunches. Towel scrunches are my #1 exercise that I recommend for patients who have excessive foot pronation or need to develop more of an arch in their feet.
- As a forearm strengthener during towel twists. Towel twists are great for lateral epicondylitis and generally to strengthen your forearm muscles, to perform tasks such as opening tight jars.

- To perform isometric exercises such as shoulder separation. I always tell patients that during shoulder separation, the most important thing is to activate the muscles even though nothing is visibly moving. The muscles are still doing work, and the towel provides an outlet for this!
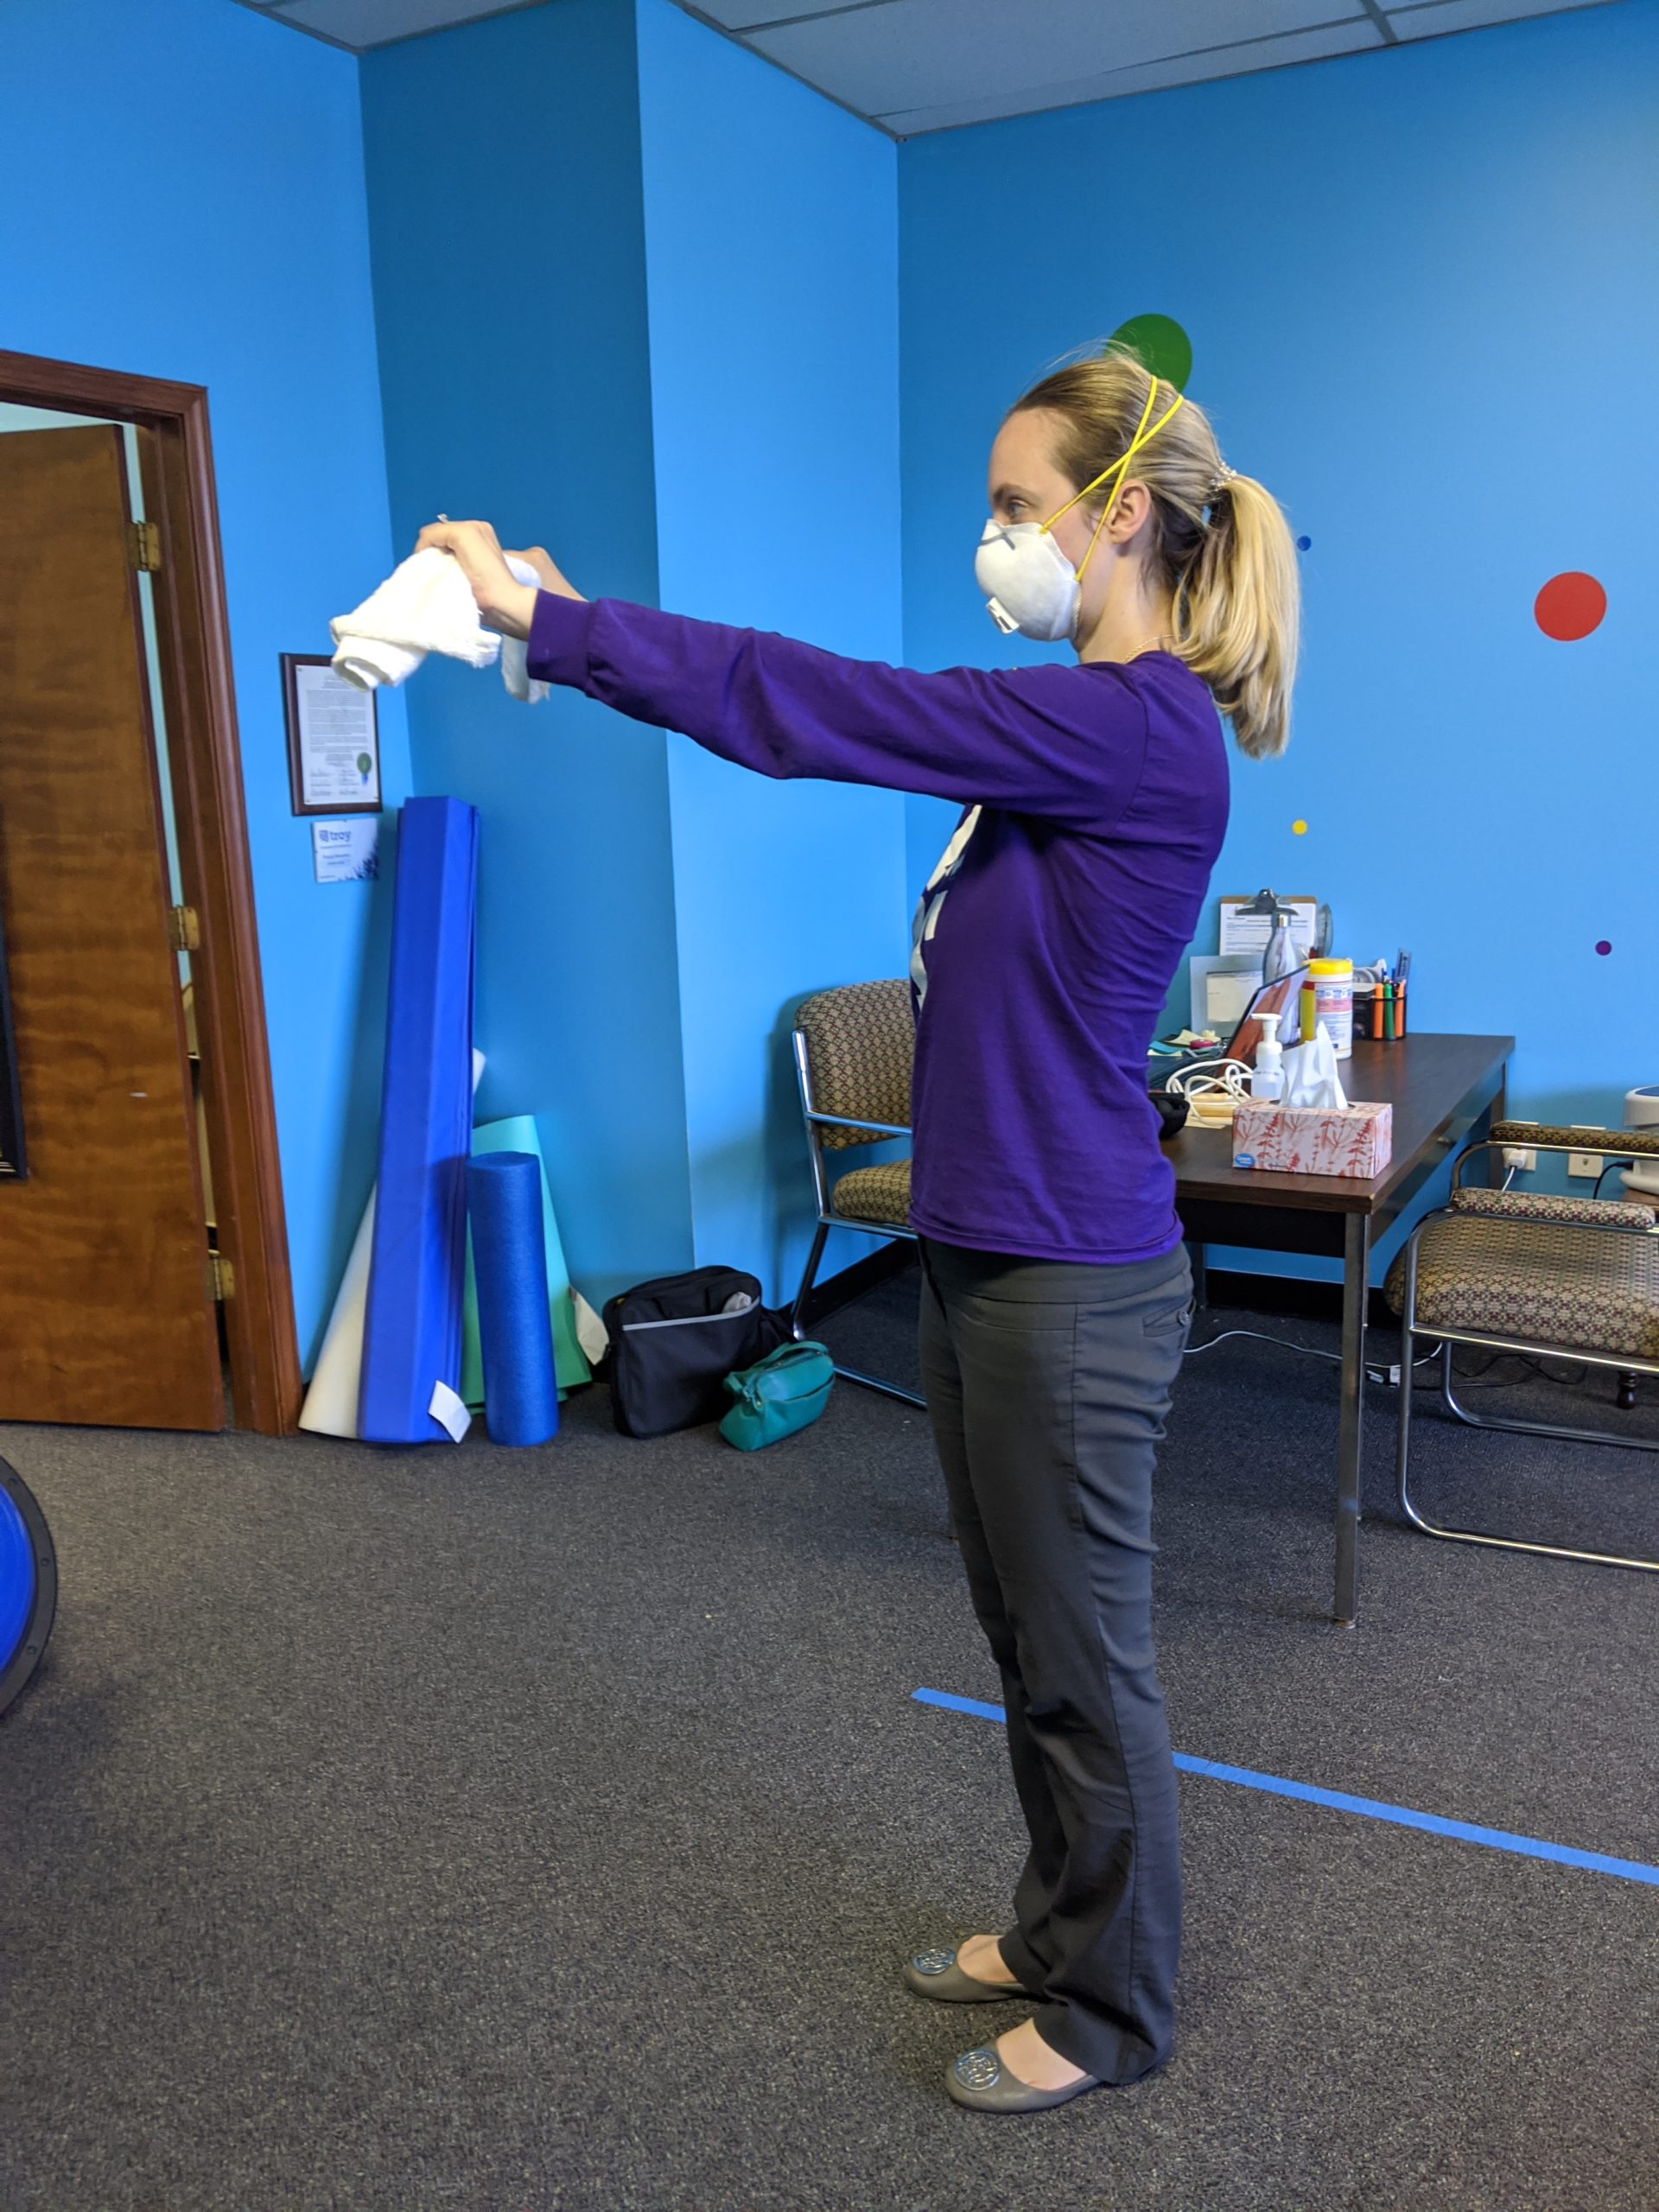
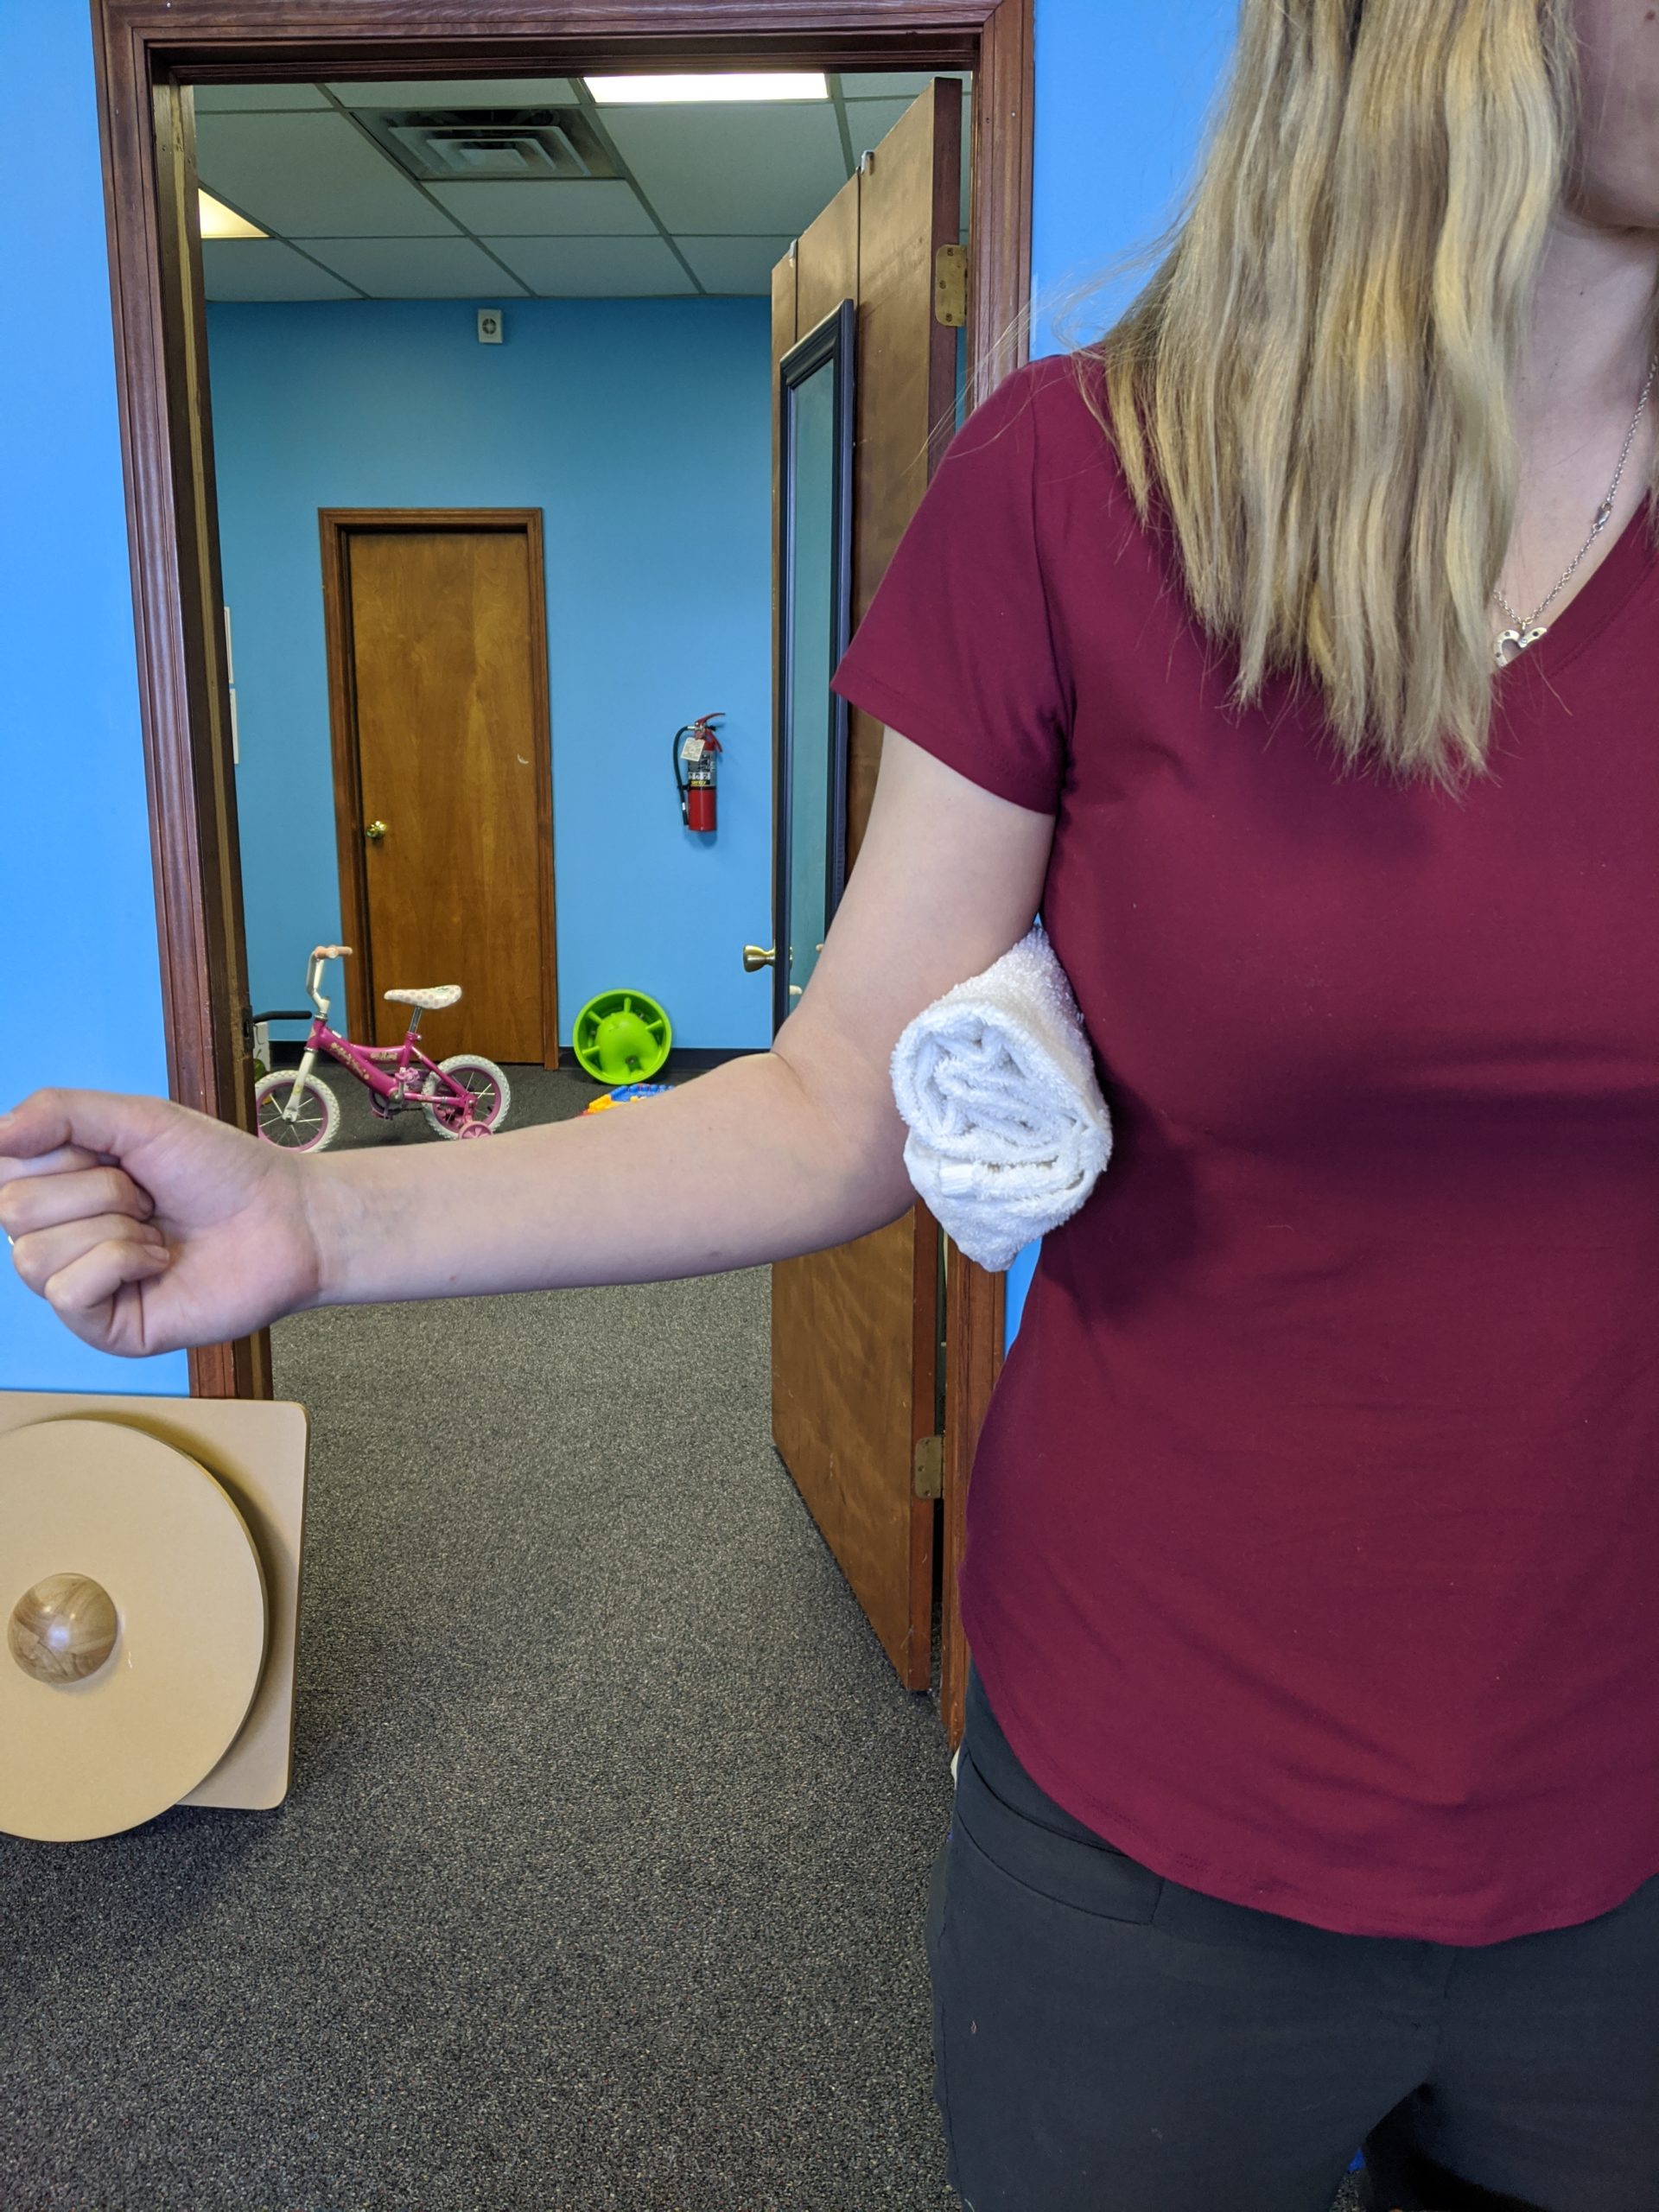
- As a chest-opener to get a pec stretch or increase thoracic extension. Using a towel vertically is a great way to substitute a foam roller during exercises to do a chest/pec stretch, or increase your extension in your mid-back.
These just skim the surface, the options are endless with a creative mind and the proper size of towel! A towel is one of the cornerstone items that I use with my patients. It’s something that everyone has in their house too, which makes carrying exercises over into a home exercise program easy. So next time you’re by the pool or getting out of the shower, think about the item you’re using as more than a drying tool – it can be used for exercise too!
Tennis Elbow: Why it Should Be Called “Activity Elbow” (and how to treat it)
First, a little explanation. Lateral epicondylitis, also known as tennis elbow, is inflammation at the lateral epicondyle of the elbow that causes pain in that distinct location as well as radiating into the forearm. Where is the lateral epicondyle, you may ask? Well turn your hand palm up, find your elbow, and look for the knobby spot on the outside of the arm. If you have sharp pain there, you may have lateral epicondylitis.
But why does tennis get all the credit for causing this pain? It’s true that tennis is a sport with repetitive movements that can cause this inflammation, but more often than not it’s other movement. Any kind of repetitive motion that can cause it! A lot of people with jobs that involve repetitive lifting (packaging, working on a line, etc) are succeptible to lateral epicondylitis. This is not only an athletic injury – thus my proposal of “activity elbow”. It’s more inclusive!
If you feel like you may have pain in the region that I described and are guilty of performing a lot of repetitive upper extremity movement, watch the above YouTube video to see demonstrations of some exercises that may help. Here are some more in-depth descriptions of the recommended exercises:
- Weighted forearm flexion using a small weight or improvizing with a soup can. This exercise as well as the next couple are targeting the forearm which is where pain can radiate to with this diagnosis. Keep elbow bent to 90 degrees and tucked in close to your abdomen in order to isolate the proper musculature.
- Weighted forearm extension (see positioning recommendations in above exercise). In the YouTube video I flipped my wrist over to work against gravity, making this exercise a bit more challenging. You can modify to make it a little easier by keeping the palm up do do this. You can also prop the forearm on a surface such as a table for this or the flexion exercise to make it slightly easier and to isolate the muscles more.
- Weighted forearm pronation and supination (turning palm over) with elbow bent to 90 degrees and arm close to your body. Pinching a towel may help to keep your arm close to your body so you don’t forget.
- While you have your towel out, towel twists are another good way to engage the forearm and improve mobility while decreasing pain.
- Tricep stretch to target compensatory muscle tightness above and at the elbow. To do a triceps stretch, raise your arm over your head with your elbow bent, like you’re trying to scratch your back. Use your other arm for overpressure.
- Radial nerve flossing. The radial nerve runs close to the area of the forearm that could be getting tight. This is good to do if you start to feel numbness or tingling down into the forearm or fingers. Nerves can’t be stretched, but they can be wiggled back and forth (kinda like flossing between teeth) to break up the sticky spots that they are getting trapped in under tight muscles. This exercise is difficult to explain, so definitely watch the YouTube video to see the visual demonstration.
One thing that is super important with lateral epicondylitis is to rest it. The inflammation was caused in the first place because of overuse, so this is your body’s warning shot to take it easy. If possible, take a break from the activity that caused it to flare up in the first place. If this isn’t an option, think of ways or talk to your physical therapist or medical professional about ways you can modify your activity to decrease the stress on that elbow. It’s amazing how a small change in the way you move can yield big results. PTs are pretty obsessed with body mechanics for exactly this reason.
We do all these exercises and more at my clinic in Troy, Michigan! Feel free to reach out with any questions, future blog suggestions, or to schedule an appointment to reduce your pain!
Muscle Energy Technique for Pelvic Rotation
I believe that the pelvis is the center of the body. This means that a slight alteration in the position of the pelvis can cause pain in the hips, knees, back, ankles, etc. So this is why I check the majority of my adult patients to see if their pelvis is even on both sides – ESPECIALLY my patients with low back and hip pain!
In my YouTube video, I walk through how to correct for a pelvic rotation. This means that one side is turned slightly either forward or backward. Muscle energy is using a patient’s own muscles to isometrically contract (i.e. contract without moving) and pull the bony structures back into their proper place.
I call this my PT magic trick. It’s a quick fix that can alleviate a lot of pain! I used to do it at parties and family gatherings frequently and people always leave with pleasant results.
I always recommend that a physical therapist or trained professional initially checks a patient’s pelvis and does the correction. This allows them to see if the pelvis is indeed rotated or if there is something else going on. A pelvic rotation presents with one leg being higher (“shorter”) than the other at both the medial malleolus of the ankle and the ASIS at the hip. Other reasons for one leg to appear shorter than the other could be:
- A leg length discrepancy – which would present as one leg being higher at the ankle but the hips being even at the ASIS
- An upslip – this means that one side of the pelvis is actually higher than the other, instead of being rotated. This requires a manipulation to correct, and must be done by a physical therapist or skilled professional.
However, if you have been to a PT and are consistently rotated on one side it’s nice to know the steps to perform a modified muscle energy at home. This is especially important in our current climate with more Telehealth therapy being prevalent, and some physical therapy clinics being closed altogether. This way people can perform the isometric contraction without the hand hold and get some relief.
The most important thing to do to maintain proper pelvic alignment after getting a muscle energy technique performed on you is to do exercises that stabilize your core and hip region without doing too much shifting onto one leg or the other. Your muscles are used to stabilizing your pelvis in a wrong position, and for 48-72 hours they are “tightening up in the correct position”. This is the most important time to maintain equal weightbearing on both legs. For this reason, avoid activities that involve standing on one leg for long periods of time. These include running, excessive stair climbing if you can help it, or jumping. Gravitate toward exercises such as bridges and planks where equal weight is being placed in both legs and the low core is being strengthened.
Above all else, listen to your body! I have a lot of patients that know when their pelvis is in proper alignment and when it isn’t.
Sitting Balance Exercises for Babies
This is the third part of my 3 part series about baby strengthening. I plan to also do a video and blog post in the future about strategies for starting to walk, but after I do a few adult related exercise videos. 🙂
The expected age range that babies start sitting is 4-6 months, although this window of time can vary. Babies start by sitting with their hands supporting them and their legs in a ring position, and then begin to sit with less and less support. I often see babies who are starting to develop their lumbar extensor muscles pushing back while sitting and falling over backwards, so keep an eye out for that! I like to keep my body or a soft pillow behind baby at all times, and counteract this extension by placing my thumbs and index fingers around baby’s pelvis. This allows me to counteract their extension by putting them in pelvic anterior rotation if necessary.
Sitting strengthening exercises are similar to core strengthening exercises, but more specific to this activity. Here are some of the activities I discuss in the above YouTube video:
- Using an exercise ball for sitting balance and core stability is great! It causes baby to use their hands and abdominal muscles to stabilize. Moving forward/backward and in circles while holding them at their hips (or under their armpits if they are weaker) is a great way to incorporate dynamic stabilization.
- Simply working on reaching outside of base of support while sitting is a good way to make sitting more challenging and mimic real life situations. Babies will want to reach for enticing toys or items in their surroundings, so placing things they like in a circle around them and then making that circle progressively larger so they have to regain their balance to pull back is ideal. Again, your hands can either be at baby’s hips or hovering close by to catch them if they start to fall.
- Using props like towel rolls or yoga blocks for baby to prop their hands on in order to transition from supported sitting to unsupported sitting seems to help!
- Side sitting is baby using one hand to prop and the other to reach. This means they are leaning all their weight onto one hand, and it’s another good way to increase baby’s independence with sitting.
For more great exercise ideas to help with sitting, check out my core strengthening YouTube video and blog post.
Creeping vs Crawling, and Exercises for Hands & Knees and Creeping in Babies
This is a good follow-up for my previous blog post about core strengthening activities for babies, as this is often the goal of working on core strength – mobility! We want our babies to be able to move in the most efficient way possible! I plan to make this a 3-part series on baby strengthening, with my next blog post being about sitting balance activities. A lot of the exercises overlap and can be used interchangeably.
In the YouTube video, I start by discussing the difference between creeping and crawling. We, as a society, use the word crawling to describe the hands and knees position that you may think of when you think of baby mobility. However, this is a misnomer. Crawling is actually used in the PT world to describe an army crawl (think your typical military movie with privates crawling through the mud under barbed wire). This means being low to the ground and doing a sliding shuffle, without lifting the belly from the ground. Creeping is actually what we want to see babies doing for the most efficient movement, and this is what you would think of as a classic hands and knees movement. Creeping is great for building core strength and coordination in preparation for walking. I often see proud parents who tell me their babies skipped the creeping stage and went straight to walking, and this makes me nervous. I want to see a baby creep because it develops the coordination and crossbody strategies that are used in the future, as well as building up appropriate abdominal strength. However I know it’s difficult to control a baby that is determined to move on to the next gross motor milestone. My only recommendation is to not encourage walking with your baby until creeping has been fully mastered.
With that being said, what are some good exercises to work on maintaining hands and knees position (or quadruped in the PT world) and facilitate creeping?
- Using an exercise ball to place baby on hands and knees and rock forward and backward is a great exercise (see core strength video). This removes baby’s ability to collapse, and incorporates weightshifting. Place your hands on either side of baby’s pelvis for stability.
- Do tall kneel with baby’s hands resting on a taller object – I used a step in the video but this can be done on an ottoman or a couch cushion, depending on baby’s height. You can even fold towels up for baby to lean on. This gets baby used to putting weight through their hands and being in a little less intense hands and knees position.
- Need a little help keeping baby’s elbows extended? Use arm immobilizers! See the YouTube video for an example.
- Need help keeping baby’s knees close together in hands and knees position, or in creeping? Some babies don’t have the inner thigh strength to keep their legs together and they end up going into frog leg position, or they want to extend one leg out in a “bike kickstand” position, or they shift on one knee and one foot. Hip helpers will assist to keep baby’s legs together! They’re like a pair of shorts with the legs sewn together. Here’s the link: https://www.hiphelpers.com/product/support-shorts/
- Basic creeping can be replicated by helping baby to move one limb then the other in proper succession while supporting the region that they’re weak in (parent’s hands supporting at pelvis, trunk, or shoulders depending). However another way to simulate this is by using a beach towel as a sling around baby’s abdomen and lifting slightly to take the weight off, and allowing them to more easily creep.
- A good exercise to practice creeping is to have baby lay on their back and do opposite hand and knee touches. This is great for crossbody motion, coordination, and abdominal strengthening. Use bubbles or toys to motivate baby to reach across.
- For older kids who would benefit from creeping, I like to use a lizard crawl exercise. This is done on the belly and involves moving all four limbs. It is not in this YouTube video, so I’ll have to do a separate video and blog post about it in the future.
As I mentioned in the YouTube video, when I work with kids I like to give them positive reinforcement for their actions 70% of the time. When practicing creeping, this means that 7/10 times you practice with baby you allow them to reach their desired goal (be it a toy, or a parent, etc). This may mean helping them along if they’re struggling. Positive reinforcement allows baby to want to continue to try this movement.
Above all, have fun with it! It’s a learning experience for you as much as for baby. I hope this information helps, and look out for my next blog post about sitting balance activities.
Core Strengthening in Babies
I’ve had a few moms approach me about working on core strengthening with their babies recently, so I felt that it could be beneficial to many parents out there and warranted a blog post. Check out my YouTube video for specific exercises with a demo baby.
When babies are going through their gross motor milestones, core strength becomes more and more important. They begin to develop it early with tummy time, and then start to engage even more muscles when they move to prop sitting and ring sitting. The true test comes when they push into hands and knees and start incorporating the coordination involved with creeping (creeping the correct PT term for what parents call crawling, this may be featured in a future blog post).
But what if baby does not stay in tummy time? Lots of babies dislike tummy time, and you may often hear, “just push through it, it’s good for them!” However some babies learn quickly to roll from belly to back and it is difficult to maintain this position. Also, babies who have reflux or GERD can be severely uncomfortable in tummy time. So I’ve listed some activities in the YouTube video to make tummy time more comfortable, as well as activities to strengthen baby’s core in preparation for sitting that don’t require being on their stomach.
- Pull to sit (baby crunches) with slow raising and lowering. This is great for engaging abs as well as strengthening neck flexors. Try to build up to 10 repetitions with no head lag and core engagement throughout. If this is too hard, hold baby’s shoulders instead of their hands. Make it fun by singing “row row row your boat” while doing the motion.
- Laying on back crossbody arm and leg touches. This is a great way to engage the obliques, and can be made fun by use of toys or bubbles to get baby to reach with opposite hand toward opposite foot. This is a great one for adults too, try it!
- Tummy time on wedge/towel roll/over parent’s knee. All of these take some pressure off the chest so babies with reflux may be more comfortable, and helps to strengthen neck extensors and shoulder girdle as well as core.
- Weight shifting on exercise ball. This is a great one for sitting balance practice and the directional shifts are perfect for core strengthening. Make sure to try different directions with baby, including forward/backward, side to side, and circles clockwise and counterclockwise. You can also use the exercise ball to work on tummy time and slowly shift baby further forward on the ball as they become more comfortable.
I hope these ideas can help parents to try some new strengthening ideas with their little ones! If you have questions or would like to make exercise modification suggestions, feel free to contact me. I expand and modify my exercises to fit each baby’s specific needs at my physical therapy clinic in Troy Michigan. And be on the lookout for more blog posts and YouTube demonstration videos in the near future!
Constipation Facebook Live Video
Tara Schwark and I dive into the topic of constipation (in babies and adults), as well as some techniques and dietary changes to alleviate this common issue.
“I Never Knew I Could Feel This Good” – Michael’s Testimonial
Move To Success PT Troy MI patient Michael:
I never believed in the power of massage or stretching. What benefit do I feel if I do a 1 hour session of yoga? I might feel lose for a few minutes, but the next day, life goes on.
Real Physical Therapy is a different level.
While a yoga session stretches the entire body (poorly), my physical therapist sees what’s wrong with me, thinks about what stretches, exercises, and massages would make the problem go away.
Originally I thought stretches were holistic solutions, until my physical therapist stretched my pecs in a way I never would have dreamed up. The length of time and pressure were perfect. I melted and have increased flexibility and posture since. From that single session I learned a way to do this while I sit at a desk. Every trick my physical therapist teaches me makes me feel incredible. I never knew I could feel that good.
Magic Items, back pain melting away
My relationship with my physical therapist has let me discover two life changing items:
Theracane- Aka, Mandy’s Stick
This is a crowd pleaser,
You know those painful spots on your back? This is your tool to massage them until they are gone. Keep applying pressure until they are gone. Its perfect.
Foam Roller
A massage has nothing on your bodyweight. For large sections of tight muscle, working on it with a foam roller will make it melt away. Using my bodyweight to apply pressures for 20-30 seconds on various parts of my upper and lower back has caused me to shake violently as my muscles melted. Incredible sensation.
The Cocktail for success
Step 1 is to take it seriously and care. If you want to feel good, you need to put the resources into learning how to solve your problems. That means both learning the PT, investing in the time to get it completed, and doing the exercises at home.
It feels incredible. My posture has changed forever. And I love “Mandy’s Stick”.
Kinesiotaping Facebook Live Video
Dr. Melissa Eiben of Pure Health Center in Troy MI partners with me in this video to explain some of the benefits and uses for kinesiotaping, and we do a few demonstrations!